
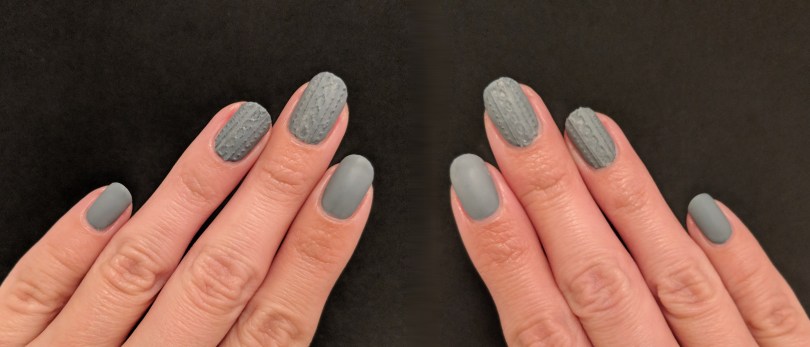
Hello and welcome! I know the knitted sweater design has been done by just about everyone, but it’s so cute that I couldn’t help myself.
So most people do this sort of design with gel polish, which made me believe that I would never do it for myself. But then I saw a video from @hannahroxnails showing off a bit of “cheat”, and I just had to try it for myself. She used these nail stickers from Sally Hansen and made it look so easy that I went ahead and bought them without doing any more research. And since they’re not expensive, I figured it would be a safe gamble.
What I Used:
- Base Coat: Glisten & Glow – Base Coat
- 1st Color: Essie – Petal Pushers
- Glossy Top Coat: Cuticula – Sour Patch Candy Timeless Top Coat
- Matte Top Coat: Essie – Matte About You
- Sally Hansen Design 3D knit appliques
- Twinkled T clean up brush, size #2
- nail polish remover
I started with base coat, per usual, and then one coat of Essie-Petal Pushers. My bottle has gotten a bit old and thick, so I put in some polish thinner before applying it. But I think that bit of thickness helped make it a one-coater.

Next, I stuck on the knit applique to my middle and ring fingers. I didn’t plan ahead of time though, and forgot to cut them to the correct size and shape of my nails. So I grabbed a nail file and took off the tip of the sticker, but it made it look rough. And then I thought maybe some nail polish remover would soften up the edges, but instead it just took off little bits.
I kept going though, in hopes that it would slowly come together. But when I applied the second layer of gray over the knit design, they still looked rough. And at this point, I was extremely worried that it was necessary to use a Sally Hansen polish for this to work. But again, I kept trying to make it better (it was too late to turn back now). I applied the thinnest top coat that I own because I didn’t want it to accidentally fill in all the little ridges. And after the top coat dried it looked a little better, but still not good enough. So I took a bit of a gamble and added the matte top coat on top. I considered it a gamble because matte nails tend to show every single trouble spot.


Somehow the matte top coat made it all work and now I love this design! And I’m so happy that I could finally try it out for myself. Of course, my nails don’t look exactly like other people’s that used gel polish. And I had a limited choice on the amount of detail for the knit design. But I’m still happy overall. Not to mention, since they were easy to use, they’re an automatic winner.


I hope everyone enjoys their week!
Update:
What would you guess I did to my nails this week? I picked at that damned middle finger again! This time around though, it was so weak that there was no way it would survive the week. So I filed it down to keep me from attacking it more and making things worse. As for how the picking started, unfortunately the knit appliques kept catching on little things (because they were raised) until eventually little bits started chipping away. And then the simple matte nails wore away because I was using them to pick at the others. I’m so disappointed in myself, but there’s nothing I can do now except shorten them all to match, and let them grow back strong.


