
Hello and welcome! I tried something new this week, and I’m not quite sure if you could call it a success or failure. Either way, watermarbling is hard.
Oh boy, for St. Patrick’s day this year I decided to use as many green polishes as I possibly could. So as a logical conclusion to wanting to use a million polishes, I decided on trying to watermarble. And I’ve seen all of the fail videos online, but had faith that watching them gave me an idea of what not to do. Like this video from cutepolish explaining all of the rookie mistakes people make. I listened to their advice, but it still turned out harder than I thought it would be, as you’ll soon see.
What I Used:
- Base Coat: Glisten & Glow – Base Coat
- 1st Color: Maniology – Coconut
- 2nd Color: KB Shimmer – Resting Witch Face
- 3rd Color: China Glaze – Grinchworthy
- 4th Color: Illyrian – Sailor Jupiter
- 5th Color: KL Polish – Capricorn
- 6th Color: Starlight Polish – Always Be Polite to Dragons
- Top Coat: Essie – Speed Setter Top Coat
- Maniology Mini Lotus mat
- Maniology latex free cuticle nail tape
- small cup of water
- toothpick
- Twinkled T clean up brush, size #2
- nail polish remover
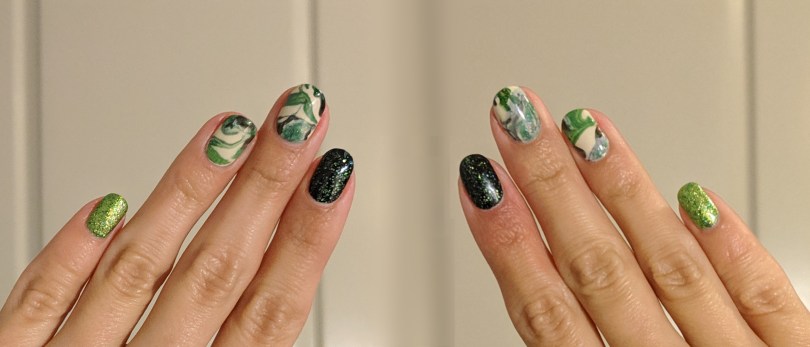
I started with one thick coat of Maniology – Coconut. Since I knew I’d be covering it up later, I wasn’t too worried about the application. Then I applied a light green glitter on my pinky nail, and a black to clear green glitter thermal polish on my pointer finger. I surrounded my remaining nails with nail tape to make the clean up process go by quickly.


Next, it was time to watermarble. It started off looking fine in the cup; all of the polishes were spreading like they were supposed to. But every time I tried making a design, or squiggles, or anything at all, the polishes suddenly just clung together in the water. After about the fifth time of unsuccessfully making a design, I just gave up and used what I could. As you can tell, it didn’t really work, but at least there’s an abstract, flowy feel to it. My thumb nail ended up being my favorite, since it’s the closest I could get to the classic watermarble design.


Well, even though they didn’t turn out exactly like I thought they would, it’s an overall cute look. And I got to use all of the different greens that I wanted. just let this be a warning not to underestimate the skill it takes to watermarble. I now understand why Simply Nailogical always calls it witchcraft!


Hope everyone enjoyed their St. Patrick’s day!
Update:
Unfortunately the witchcraft of watermarbling did not protect these nails from my usual thumb nail chips. But at lest that was the worst of it. And, in my update photos you can see the thermal polish in the middle of it’s transition. I didn’t pick the right week to wear a thermal though. It’s always so much fun to see the transition of colors, but this week seemed like any sort of temperature changes were non existent. Even between the inside and outside temps. So I’ll just have to wear another one soon.


😍
LikeLiked by 1 person