
Hello and welcome! This week I’m doing another collaboration, and it’s for one of my favorite childhood characters: Mario!
I joined this collab because Faith from @endless_shades asked if anyone wanted to join her in doing some Mario day nails for March 10th. It’s MAR10 day, get it? So obviously I had Mario Bros as my inspiration, but I had also just conveniently bought Mario & Luigi themed nail polishes from the February Polish Pickup. The theme was Duos & Pairs that month, so it’s almost like the universe knew I would need them, and get them just in time. So the group consisted of me, Faith, Carol, Joanna, and Lanette, and here is our group collage:

What I Used:
- Base Coat: Glisten & Glow – Base Coat
- 1st Color: Native War Paints – It’s A-Me Mario!
- 2nd Color: Savannah Lacquer – Luigi Time
- 3rd Color: Painted Polish – Stamped in Greenery 2.0
- 4th Color: KL Polish – Chloe
- 5th Color: Maniology – Nikko
- 6th Color: Twinkled T – Vibin’
- 7th Color: Twinkled T – Glow Up
- Top Coat: Essie – Speed Setter Top Coat
- Ribbitsstickits @!#?@! water slide decals
- small cup of water
- Maniology dual ended dotting tool & nail art brush
- Maniology dual ended clean up brush & pencil stamper
- nail polish remover
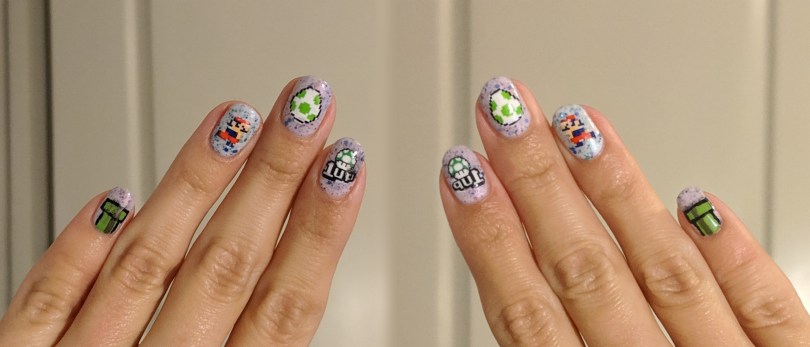
I started with my usual base coat, and then three thin coats of Native War Paints – It’s A-Me Mario!. I really wanted to make sure you can see all the little blue and red speckles in the polish so I didn’t mind all the coats. I then added Savannah Lacquer – Luigi Time to my ring finger and thumb nail, as an accent.


Next I simply added the water slide decals. I can’t remember when I bought these video game themed decals, but I’m glad I did. It would have been insanely simple if I had just put the decals in water, and put them on my nail. But I decided to add white to the backs of them to make sure they were extra opaque. I made one little mistake though. For my right hand I was flipping the images over, so that they would mirror my left. But I forgot about the wording on the 1up mushroom, so it turned out backwards.


Lastly, I decided to free hand a star and a green pipe on my pinky and thumb nail. I’m not really sure what made me just go for it, but I did. And they didn’t turn out too bad. The pipe was just a light green rectangle with some edges poking out the sides, with one dark green line in the middle. And the star was some sloppy triangles fit together. I started that with the straight line horizontally, then up, then the two “legs”. The black outline was definitely the hardest part, since it had to be more precise.
After some top coat, they were done. And I love these nails! The decals made everything 100 times easier, and were just perfect for the theme. And when you look at the group collage, everyone did just amazing free hand nail art that these decals are the only way for me to keep up right now. Maybe I’ll get better with the free hand, but I really don’t mind using decals/stickers/vinyls. They just make life so much easier!


Hope everyone enjoys this quick look back to the 80’s/90’s!
Update:
Hmmm… I’m not exactly sure what kind of magic these Mario decals hold, but they obviously have something in them. My nails stayed perfect the entire week. There was not chipping, no picking, and no peeling of the decals, so I don’t really know what to say besides that. Other than maybe the Glisten & Glow, Native War Paints, and Essie formulas all work very well together.


