
Hello and welcome! I’m officially starting my Halloween manis, and I’m way too excited! I just have so many ideas for the next few weeks, and so little time.
This weekend we’re pumpkin carving & watching Hocus Pocus with friends. Is that anyone else’s favorite Halloween movie? I’m too much of a wuss to watch anything scarier. So since I knew it was going to be a cutesy scary weekend, I had to pull out this stamping plate I bought from Maniology from back when they were called Bundle Monster. It’s a scary cute stamping plate, with individual images of Halloween like things (witches, ghosts, cats, etc). And since we’re watching Hocus Pocus, I grabbed my newly purchased polish inspired by that movie. It’s called Another Glorious Morning, from Quixotic Polish, but unfortunately it was limited edition for Polish Pickup so it’s not available anymore. And this will be my first ever magnetic polish, so it’ll be an adventure! I’ve attached photos from Quixotic themselves, because I could not as good a picture as they deserved.
What I Used:
- Base Coat: Glisten & Glow – Base Coat
- 1st Color: Quixotic Polish – Another Glorious Morning
- 2nd Color: Maniology – Boys’ Tears
- 3rd Color: Maniology – Corpse Flower
- 4th Color: Cirque Colors – Boozy Brunch
- Top Coat: Glisten & Glow – Top Coat
- Quixotic Polish hand painted magnet
- Maniology Mini Lotus mat
- Maniology Scary Cute BM-202 stamping plate
- clear silicone stamper & scraper
- lint roller sheet
- acetone nail polish remover
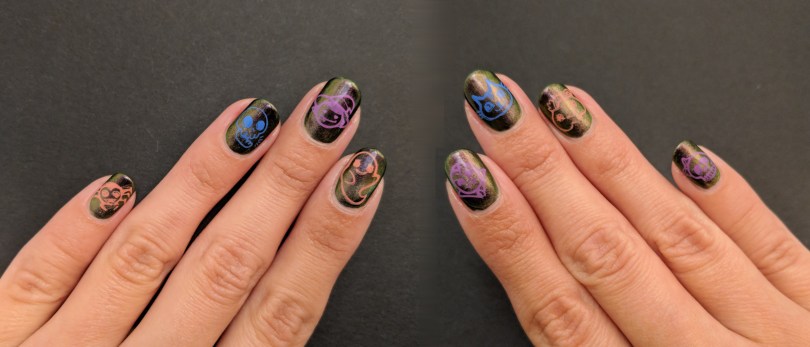
I started with base coat and two simple coats of Quixotic’s Another Glorious Morning. And then I did one more coat, one finger at a time, to use the magnet. I did different angles on all of my nails, just for fun and experimentation. And I quickly learned that how you hold the magnet greatly affects the sharpness and quality of the shimmering line. Even though I tried to keep them symmetrical, you can see a huge difference between both hands. And it’s all because I placed the magnet a bit differently.

Next, really quickly, I tested out which colors I might want to use for the stamp. I wanted to use bright colors because I wanted to make sure you could see them through the dark, distracting base. But also, I was trying to pick something that complimented the purpley-green shift. In the end, I decided on using all three colors. And I think it makes them look even more scary cute.

Next, I stamped on the images. One image per nail, because they ended up being a bit larger than they look. I was tempted to try multiple colors over each other, but in the end I didn’t want to risk ruining everything. Each nail has a different image, and I tried to match them to the movie as much as possible. There’s obviously a witch and a cat, but also: a spider, talking skull, ghosts, a devil/demon, vampire, pumpkin, and skull. I’d love to know if you can match up all the images to the certain scenes I was thinking about.

This turned out more fun than I expected, obviously in a good way. Having the multiple colors just makes all of the nails pop and not feel so uniform. And it’s been great getting to see what lighting gives which color shift. My home makes them look different than when at work or my boyfriends. As the start to my Halloween manicures, this just gets me much more inspired and amped up!


Hope everyone enjoys an adorably spooky week!
Update:
I feel like the magnetic line in the base polish slowly lost its sharpness But honestly, the lines weren’t very sharp in the first place. And I liked the subtle look better because it felt like the purple to green was more of a gradient. There were still times & places that my nails were all purple, or all green, and it was always fun to see. As for the wear, on Tuesday, the corner of my left thumb nail lifted. But luckily, I was able to get home and “glue” it back down before anything else happened. So I just used base coat for glue, and reapplied top coat to even out the fault line. Every other nail just had the normal wear at the tips, but nothing else.


