
Hello and welcome back! Hope everyone survived their second week of 2018. For my mani this week, I knew I wanted to use one of the new reds from my mom, but I couldn’t quite decide what to do.
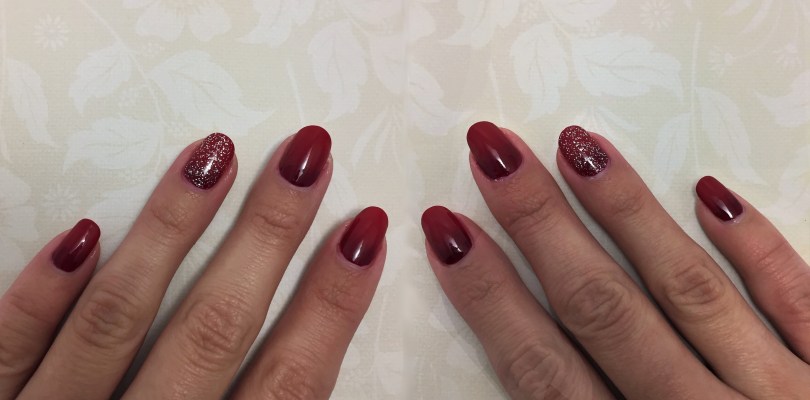
So I went through my Pinterest and Instagram accounts, and dug through all of the red nail designs until I found something that I really liked, and that I could actually do. I used a post from @mari_nails_nsk as inspiration, with the black/dark red to lighter red gradient. I knew I wouldn’t do any of the jewel bits, but it’s beautiful to look at!
What I used:
- Base Coat: Glisten & Glow – Base Coat
- 1st Color: Sally Hansen Insta-Dri – Rapid Red
- 2nd Color: Sally Hansen Miracle Gel – Can’t Beet Royalty
- Glitter: UNT – SY070
- Top Coat: Glisten & Glow – Top Coat
- Bliss Kiss Simply Peel latex barrier
- acetone nail polish remover
- Twinkled T clean up brush, size #2
- makeup sponge
The start of this mani was extra easy. I used my usual base coat, and one coat of Insta-Dri – Rapid Red. I absolutely love the Insta-Dri line. Mostly because I hate waiting for my polish to dry, but also because they’ve got a decent formula. I just wish they had more colors. Then, I added Simply Peel around all of my nails. My bottle is still really chunky, so I’ve been looking for another brand or type of barrier. But I know that liquid latex dries so quickly, I might just have to stick to cuticle tape. If you have any recommendations, let me know.

Next, was the gradient. It was pretty easy since there were only two colors involved. I was hoping I would only have to do one coat of the gradient, but it just wasn’t dark enough. So I let the gradient dry completely, and did one more coat. Even with two coats, it’s not the darkest, but that’s due to the polish color. It worked out, but I probably could have added black to the end of the gradient to make it look more complete.


I accidentally flooded some of my cuticles because I got a little over zealous with how much polish I put on the sponge. And it was a nightmare to clean up. And this clean up was probably what took me the longest amount of time. Then once it was all dry and somewhat clean, I decided to add some glitter and give myself something more fun to look at.

I’m not sure if it’s just because I got used to looking at my matte nails from last week, but these nails seem extra glossy. I love it! And as an extra perk, they didn’t take very long (maybe two hours).


Have a great week everyone! My next mani will be a day early because of vacation. So expect a fun theme.
Update:
Well this week I had quite a few chips, but I actually had time to repair them before they got out of hand. By Sunday night I had chips on my right hand. Which was pretty surprising because I was starting to think that my right hand’s nails were indestructible. I filled the chips with polish and covered the line in top coat, and everything was fine. But then on Tuesday, while I was packing for my trip, my left thumb nail started to chip. Since it was still attached a bit, I just put some base coat on underneath and stuck it back down.


