
Hello! I hope everyone is ready, because this week we are celebrating. Not only is it Mother’s Day weekend, it also happens to be my boyfriend’s birthday celebrations. So of course, I had to do something special this week.
Since this weekend is all about celebrating the one’s I love, I just knew I had to use my Bundle Monster Let’s Celebrate stamping plate. I bought it a few weeks ago in preparation for something like this. So I’m glad that I was right about needing it. Then, it was just a matter of deciding on what colors to use. I was originally thinking of a red-pink gradient (since that’s a very lovey-dovey color). But then I saw these blues all in a row, and I just had to use them.
What I Used:
- Base Coat: Orly – Bonder
- 1st Color: KL Polish – St. Clair
- 2nd Color: KL Polish – Coconut Milk
- 3rd Color: KL Polish – Porter Miami
- 4th Color: Sally Hansen Color Therapy – Glow with the Flow
- 5th Color: Sally Hansen Complete Salon Manicure – Stellar Style
- Top Coat: Glisten & Glow – Top Coat
- Bundle Monster Poli-Peel cuticle protector
- makeup sponge
- Bundle Monster BM-XL30 stamping plate
- silicone stamper & scraper
- lint roller sheet
- Bundle Monster double side nail art brush & dotting tool
- acetone nail polish remover
- Twinkled T clean up brush, size #2
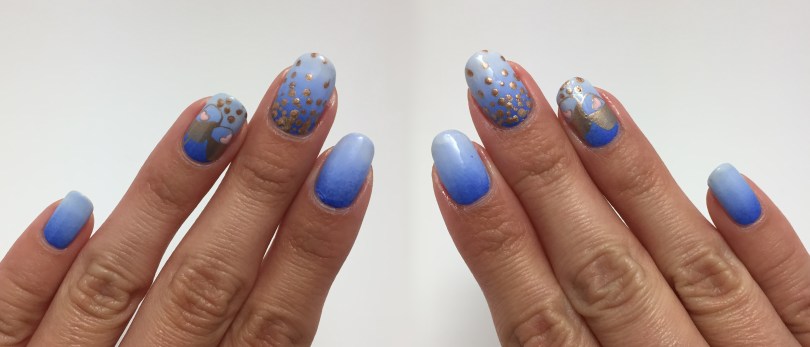
I started with my Orly base coat, and one coat of St. Clair from KL Polish. It wasn’t the best at one coat, but I was going to cover it up with gradient, so I didn’t mind leaving it like that for a day. Then, I applied lots of liquid latex around my nails in preparation for the gradient (I was not in the mood for clean up).

I was hoping to get the gradient done that same night as my base, but it’s never been my strong suit, so I decided not to risk it. My problem has always been that I try to rush through gradients, so they never look quite right. But I think this time I did enough layering and overlapping of the colors. The first coat of the gradient was actually really opaque, so I debated on leaving it. But I wanted more of a white tip, and a darker base. And I think the second layer really made a difference. Looking at them now, a third might have made all of my nails look perfect.


Next, I chose a stamp with cute champagne glasses, hearts, and bubbles. But it was just a little too big for my poor nails. You can’t even see the stems of the glasses. I really wish I could have gotten more of the image showing, because it’s just so cute! I guess it’s just meant for someone with longer, wider nails. Then I wanted the bubbles to continue floating up on my middle finger. But I wasn’t about to try to freehand bubbles, or stamp just the top of that image and Frankenstein some bubbles together. So I made the decision to grab a dotting tool, fill the bubbles on my ring and thumb nails, and make some bubble dots on my middle finger. I think it worked out pretty well, even though the bubbles were just a bit cuter when they were just an outline.

And at the last minute I decided to fill the hearts with pink. It just makes them pop a bit more, don’t you think? A layer of top coat later, and my mani was done. The gradient was definitely what took the longest. But it’s definitely one of my best gradients I’ve done yet, so I’m feeling pretty good about it all. Well now that I’ve finished this playful design, I’m just about ready to start my fun weekend in Tahoe.


I hope everyone enjoys themselves this week!
Update:
There were a ton of chips this week, but they were all tiny. You can’t even see them in the pictures because they were all around the edges. It was more like wear and tear. I guess it’s good that my mani stayed mostly intact, but boy was it annoying. The rugged edges kept getting caught on things so I had to file down what spots I could. At least I didn’t have to try and fix the gradients.


I LOVE your blog! I followed you and would REALLY love for you to follow me back so we can support each other as bloggers and nail techs 🙂 Thank you so much! ❤
LikeLike
Sorry it took so long, but thanks for the sweet comment!! I love the support in the nail community 🙂
LikeLiked by 1 person