
Hello, hello! This week’s mani is a bit of an extension to Valentine’s Day. But, it has almost nothing to do with hearts, I promise.
This weekend, my boyfriend and I are going to San Francisco to relax and celebrate Valentine’s Day. And when we went last year, we picked up this cute SF heart magnet to commemorate the trip. So with all the beautiful colors on the it, I decided I wanted to do something inspired by it before the trip. I even held the magnet up to all of my nail polishes to make sure that I picked the colors that matched it the closest.

What I Used:
- Base Coat: Glisten & Glow – Base Coat
- 1st Color: Sally Hansen Hard as Nails Xtreme Wear – White On
- 2nd Color: Sally Hansen Hard as nails Xtreme Wear – Sun Kissed
- 3rd Color: KL Polish – Mami Martha
- 4th Color: Pure Ice – Celestial
- 5th Color: OPI – Yank My Doodle
- 6th Color: Sally Hansen Insta-Dri – Rapid Red
- Top Coat: Glisten & Glow – Top Coat
- nail polish remover
- Twinkled T clean up brush, size #2
- latex-free cuticle tape
- Twinkled T striping tape
- makeup wedge sponge
- Bundle Monster double sided dotting tool/nail art brush
- small plastic cup
I started with my usual base coat, and one coat of my trusted Sally Hansen – White On. I finally bought some nail polish thinner, and it’s helped make the polish more manageable, but I think the new problem is that it’s running out. I was a little sloppy putting on the white, but I didn’t mind since it was going to be covered up anyways.
And then, when that was dry, I added the cuticle tape around all of my nails. I also added striping tape to make a very simple version of the Golden Gate Bridge. I know you can buy different size striping tapes, but I only had the one size, so I doubled up on the tape to make it a little thicker.


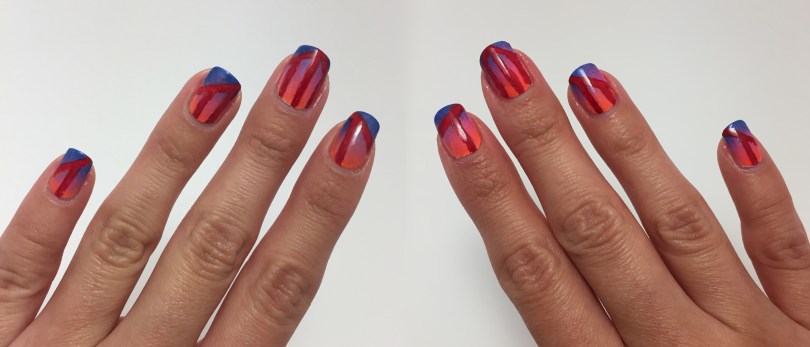
The next step was to sponge on the gradient. Since I had added the white first, the orange, pink, and blue popped beautifully. But, I knew I had to pull up the striping tape as quickly as possible to make the cleanest lines, so I rushed the gradient a bit. Which didn’t help at all because I still didn’t lift the striping tape fast enough. And I ended up with sloppy lines, and a sloppy gradient.
Lastly, I filled in the white lines with the closest color I had to the burnt, red-orange on the magnet, which was OPI – Yank My Doodle. But once I had started filling it in, I realized that 1) it was too patchy, and 2) it blended into the gradient too much. I kept going, adding it to the rest of my nails to keep it consistent. But I was definitely nervous that I had just ruined everything. Luckily, I was able to cover it up with an opaque red once everything dried.


Overall, I love the color combinations, but I’m not sure if I like how simple it is. It’s definitely a subtle resemblance to the Golden Gate, but I can’t think of anything else to add. Who knows, maybe throughout the week I’ll add a little something here and there to play around with it.


Update:
Guess how long this mani lasted? I didn’t even make it through the weekend! Between my anxiety for all the people/traffic and drinking more than I normally do, I just could not stop picking at them. And I actually just gave up, and completely redid them once we got back on Sunday night. At least they were fun while they lasted


Update #2:
So for the redo, I went with this beautiful blue from Cirque Colors. And I was going to just leave it, until I remembered that I had a fun sea themed stamping plate. So on Monday night, I added some light blue stamping on top.
What I Used #2:
- Base Coat: Glisten & Glow – Base Coat
- 1st Color: Cirque Colors – Clink!
- 2nd Color: KL Polish – St. Clair
- Top Coat: Glisten & Glow – Top Coat
- Bundle Monster BM-S166 stamping plate
- silicone stamper & scraper
For the most part, these nails only had some small chips on the edges. Of course, that’s except for my thumb nail. While I was cleaning my office during the week, my thumb nail chipped horribly. So for a quick fix/cover up, I just added the blue and didn’t even bother re-stamping.


