
Is anyone else surprised at how fast this year has gone by? It’s almost Thanksgiving! How crazy is that!? But anyway, this week I just could not decide what I wanted to do with my nails. I’ve been debating between using my leaf nail vinyls to be subtle, or being very literal with the upcoming holiday and going for turkeys. So I just went with both. 🍁 🦃
When I bought my Halloween vinyls from Twinkled T earlier this year, I also bought these falling leaves nail vinyls while I was at it. I like them better than my Halloween ones, probably because they’re a simple pattern. I just wish there were more leaves per stencil because I used a good chunk of them just on these nails.
While searching on Pinterest for some Thanksgiving nail inspiration, I found this Instagram post from @banicured_. It’s cute, it’s simple, and I figured I just might be able to pull it off with my new dotting tool/nail art brush set (from Bundle Monster-see previous post for link). She also has a quick video how-to, but she strictly used nail art brushes, and I know I’m just not good enough yet to do that. So I decided to do the big, round eyes only with my dotting tools, and it turned out pretty well.
What I used:
- Base Coat: Glisten & Glow – Stuck on Blu!
- 1st Color: Glisten & Glow – Frosty Camel
- 2nd Color: OPI – That’s What Friends are Thor
- 3rd Color: OPI – Yank my Doodle
- 4th Color: Sally Hansen Hard as Nails – Black Out
- 5th Color: Sally Hansen Hard as Nails – White On
- 6th Color: Sally Hansen Hard as Nails – Mellow Yellow
- 7th Color: Color Concept – red
- Shimmer: Unmarked brown/silver
- Top Coat: Glisten & Glow – HK Girl
- nail polish remover
- Twinkled T clean up brush, size #2
- Twinkled T falling leaves nail vinyls
- Bundle Monster double sided nail art brush & dotting tools
- small plastic cup
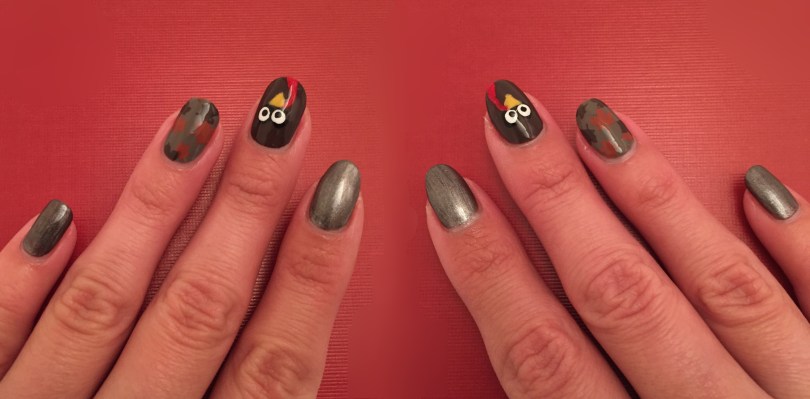
My nails started out simple enough. I put on the base coat, and then two coats of color: That’s What Friends are Thor on the pointer, middle, and pinky fingers, and Frosty Camel on the ring finger and thumb. Then, to save on time, instead of doing each nail pattern individually, I made progress on all of them at the same time.
I have this unmarked brownish silver shimmer color in my collection, which I have no idea where it came from, but I thought it would bring the colors together nicely so I wanted to use it. Looking at my nails now, it definitely looks much more silver than brown, but I promise the polish looks brownish in the bottle. But, I left the shimmer on my pointer and pinky fingers anyways. Then moved on to the eyeballs of the turkey on my middle finger. They’re a little small in comparison to the one banicured did, but that was my biggest dotting tool and I don’t trust myself trying to make a bigger circle. Lastly, I added the vinyls onto my ring finger and thumb.


After doing the orange leaves, I felt like my nails weren’t looking very compatible, so I changed my idea from only orange leaves to orange and brown. While I was waiting for the orange to dry, I moved on to more of the turkey. With my second largest dotting tool, I plopped on the whites of the eyes. Then came the tricky part, using a nail art brush to make the triangle beak. Thankfully, I had much more luck doing these triangles than I did when I tried to do the star last week.
Now that all my leaves were dry, I added the brown leaves on top. I had to get a little creative though, since I didn’t want it to look like a random patch of orange next to a patch of brown. I wanted them to mix together. Now I had to individually place the leaves instead of the bundle they come in. It wasn’t hard, it just took longer than I planned originally.
Then, back to the turkey. I used a small dotting tool to place the black pupil. And you might not be able to tell in the pictures, but the yellow was a little sheer against the brown, so I had to do a second layer. Last was the “red turkey thing” (Google search says it’s a snood). I put the red straight on to the brown, but it just wasn’t visible at all. So I had to go over it with some white, let that dry, and then place the red again. With some top coat, my nails were finally done!


These nails feel like they took me forever, when it was actually only 15 minutes more than my usual three hours. I think it was probably just all the steps I had to take, I normally have more down time to just sit and let them dry. In the end, they look like a mishmash of fall, but that’s what I was going for.


I hope everyone has a happy Thanksgiving!
Update:
Where do I even begin with these nails? I don’t think a day went by this whole week where I didn’t have some sort of chip or problem with them. It all started on Sunday morning when I woke up to a baby chip on my left middle finger. But, by Monday at work, I had completely picked off all of the nail polish. So I went home that night and redid the entire nail (bright side-I think I did a better turkey the second time around). Then sometime on Tuesday night, I picked at the corner of my right pointer finger. Since it was so late on Tuesday, I decided to leave it. But I woke up with another chip on my left middle finger! I was so frustrated with my nails i didn’t even try picking at them on Wednesday. And I didn’t even bother fixing them until Thursday morning, just before leaving for my mom’s house. They lasted through all of Thanksgiving, and my mom really liked the turkeys, so I suppose they were worth the trouble.


